Developer Guide
System Requirements
Before you start, make sure you have the following applications and their minimum versions installed, in addition to Node.js and yarn (as mentioned earlier):
- Node.js 18.0.0 or later
- Yarn 3.0.2 or later
- macOS, Windows (including WSL), and Linux are supported.
Get Started
Setup
- Clone the forked repository and open the created directory
- Install dependencies
@revertdotdev/backend
Copy the example env file in packages/backend folder.
Fern setup
-
Login with Fern with
fern login. -
To generate Fern drive code locally, run
yarn fernin the root folder of this repo. This will create thepackages/backend/generatedfolder with the generated code.
Fern setup fails
If yarn fern fails to succeed, here are some temporary solutions.
-
Try running
yarn fernin wsl. -
Install fern-api globally in wsl.
npm i -g fern-apiwill install fern-api globally in wsl and then in the root of this project runfern generate. -
Try dual booting your windows machine to ubuntu or any other linux distribution and setup the project their.
-
Try to change the internet network.For eg: if you were using mobile network,try using another mobile network/different sim and try to run
yarn fernin wsl multiple times.
These solutions are not permanent, and there is no guarantee that they will work reliably in all situations.Order is not important,any one of them may work for you.
Setup Redis
-
Have a redis instance running locally or use https://upstash.com/ to get a redis url.
-
Update the redis url in
.env.A redis url looks like thisredis://<username>:<password>@<hostname>:<port>/<database>. Useredissinstead ofredisif you use a secure connection over TLS/SSL in redis.
Setup PostgreSQL
-
Install PostgreSQL on the system before seeding the database with sample data
-
Refer https://www.postgresql.org/download/ for instructions.
-
Get a PostgreSQL url and update it in
.envA pgsql url looks like thispostgresql://<username>:<password>@<hostname>:<port>/<database>
Applying Existing Migrations
- Apply the existing migrations to sync the database with sample data with the schema.
Seed the database
- Seed the database with sample data
Running the API locally
- Backend service locally at
:4001
@revertdotdev/client
Copy the example env file in packages/client folder.
Generate a Tunnel URL
-
First, generate a tunnel URL using
ngrok http <4001 or YOUR_SERVER_PORT> -
Copy this URL to your clipboard as you’ll need it in the next steps.
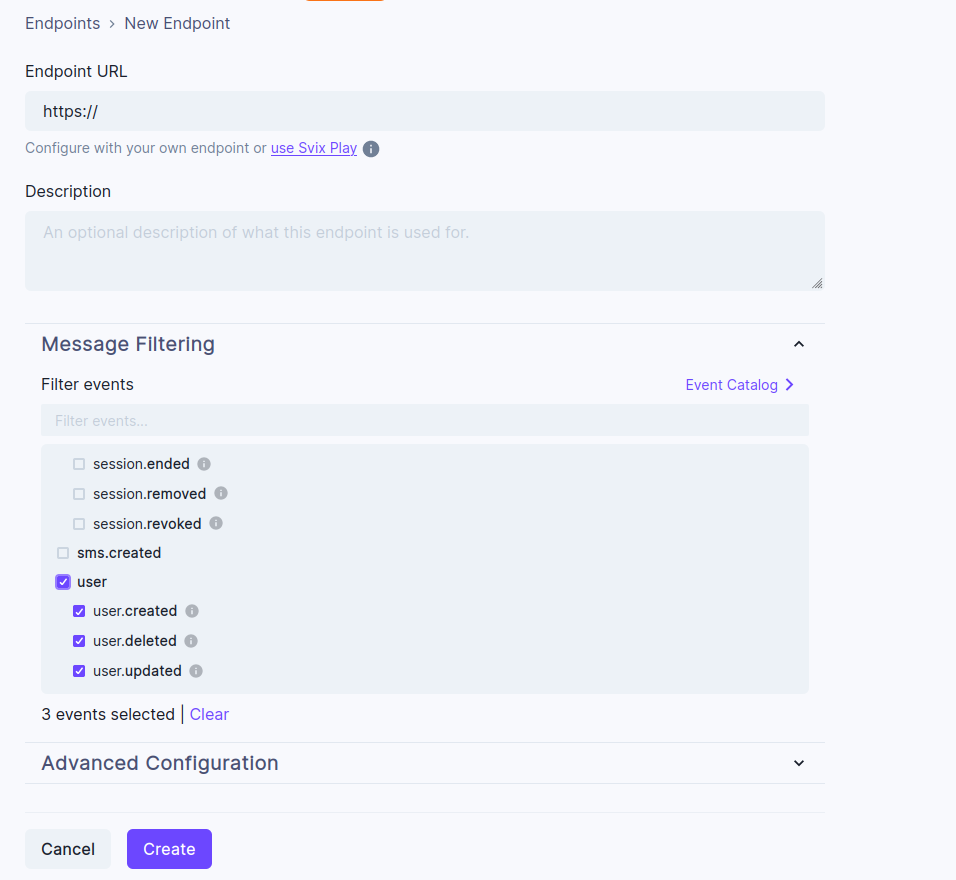
Configure Clerk Webhook Endpoint
-
Access your Clerk dashboard (Sign up on https://clerk.com/ if you have not already).
-
Navigate to the webhook settings.
-
Ensure that the webhook endpoint is set to
<Tunnel_Url>/clerk/webhook -
Ensure that you are listening to the
user.createdevent by ticking theuserobject underMessage Filtering
Sign Up in Your Application
-
Run
yarn dev:allin the root of this repo(Your backend must be setup). -
Go to
localhost:3000and sign up. -
In your Clerk webhook dashboard, click on your webhook endpoint,go to logs and filter by user.created and you will see a new user created.Enter inside it and copy the content.
Testing Clerk Webhook with Postman
To verify that Clerk is sending user creation notifications to your endpoint, you can use Postman for testing.
-
Open Postman and create a new request.
-
Set the HTTP method to POST.
-
In the request’s URL field, use
http://localhost:4001/clerk/webhook. This is the endpoint Clerk will send webhook events to. -
In the request body, paste the
user.createdobject that you copied from your Clerk dashboard.